
ACJ Electronics provides component-level printer hardware diagnostics in Poblacion, San Vicente, Ilocos Sur. Led by Angelo Carlo A. Jacinto (BS ECE, NC II), our workshop recovers clogged printheads, replaces worn feed rollers, clears waste ink absorber counters, and repairs logic board power rails before any paid work begins.
When searching for a dependable printer repair shop near me or qualified printer repair near me in San Vicente, Vigan City, Bantay, Santa Catalina, Caoayan, or San Ildefonso, bringing your machine to a hardware engineering bench ensures a permanent mechanical and electrical fix. For home offices, schools, and local businesses requiring commercial Epson Canon HP printer repair Ilocos Sur or certified printer repair San Vicente, our bench isolates faults across micro-fluidics, precision gear trains, optical motion sensors, and switch-mode power circuits. A symptom that looks like a ruined printhead often traces to dried ink in the purge pump or air in the damper lines, while persistent paper jams frequently stem from glazed rubber rollers rather than motor failure.
Before committing to equipment replacement, review our diagnosis on the Printer Repair Hub, assess typical expenses in our printer repair cost guide, troubleshoot feed issues with our printer paper jam guide, and decode machine alerts using our printer error codes guide. You can also explore our complete service catalog on the services index, compare bench rates on the Electronics Repair Pricing Hub, assess repair economics on the Repair vs Replace Hub, and review our diagnostic tools on the Tools and Skills Hub.
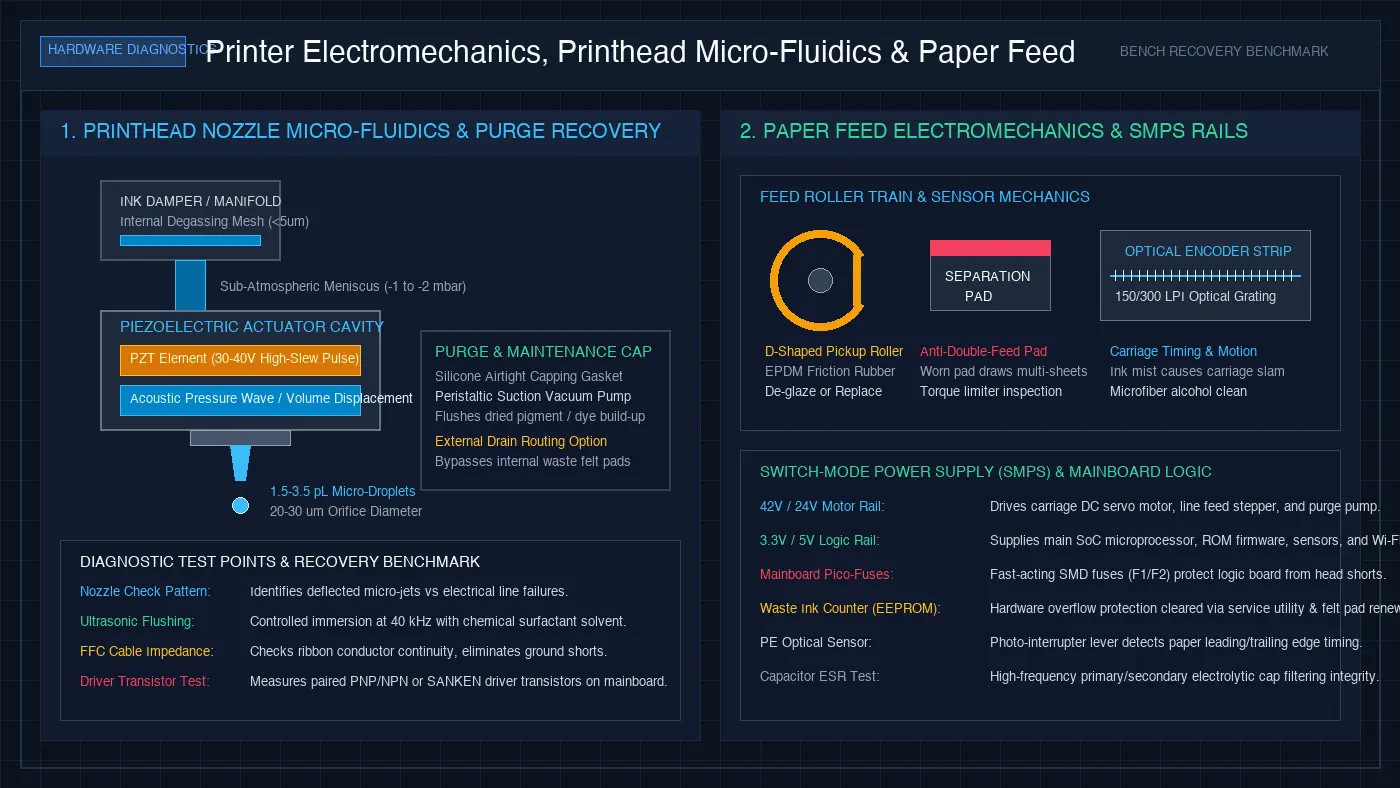
Piezoelectric and Thermal Printhead Recovery Protocols
Modern inkjet printers rely on either piezoelectric ejection (common in Epson EcoTank and WorkForce series) or thermal bubble ejection (standard in Canon PIXMA and HP DeskJet / Smart Tank units). In piezoelectric heads, microscopic lead zirconate titanate (PZT) ceramic elements flex when hit with a 30V to 40V electrical pulse, generating acoustic pressure waves that fire ink droplets as small as 1.5 to 3.5 picoliters through 20 to 30 micrometer nozzle orifices. In thermal printheads, miniature thin-film resistors flash-heat ink to over 300°C in microseconds, expanding a vapor bubble that forces ink out the nozzle.
In our tropical climate, stagnant ink dries quickly inside these microscopic cavities. When standard automated cleaning cycles fail to restore a missing nozzle check pattern, running repeated built-in power clean cycles only floods the waste ink pads and risks burning out head driver transistors. At our San Vicente workshop, we deploy a staged printhead cleaning service and bench recovery protocol:
- Chemical Solvent Soaking and Reverse Flushing: We connect chemical-resistant silicone tubing directly to the printhead intake manifolds. Using a calibrated syringe, we introduce an aqueous surfactant solvent heated to 45°C to dissolve dried pigment and dye deposits. We apply gentle bidirectional fluid pulses to draw particulate matter out through the manifold rather than forcing clogs deeper into the microscopic nozzle filters.
- Ultrasonic Immersion Cleaning: For stubborn, calcified ink obstructions, the printhead assembly is suspended in a temperature-controlled ultrasonic bath. We immerse only the bottom 1.5 mm nozzle plate in specialized cleaning solution, keeping delicate electrical driver contacts completely dry. High-frequency 40 kHz acoustic cavitation dislodges stubborn particles from the orifice walls within minutes.
- Ink Damper and Degassing Inspection: Continuous ink supply systems (CISS) rely on damper cartridges with internal micro-screens (filtering particles larger than 5 micrometers) and silicone check valves. Saturated, air-filled, or torn dampers disrupt the negative sub-atmospheric pressure balance (-1 to -2 mbar) required to maintain ink meniscus tension at the nozzle plate, causing color starvation during long print jobs. We bleed air pockets, replace ruptured damper membranes, and restore airtight seals.
- Printhead Driver Rail and FFC Inspection: When an entire color channel vanishes abruptly or a printer outputs blank pages despite a wet head, the fault is usually electrical. We inspect the flat flexible cables (FFC) under magnification for folded conductors or liquid ink intrusion that bridges signal pins, and measure driver transistors on the mainboard for dead shorts.
Paper Feed Roller De-Glazing and Gear Train Alignment
Frequent paper feed failures, skewed sheet intake, and false paper jam alerts stem from mechanical friction loss or optical sensor misreads along the paper transport path. A printer transport mechanism contains a D-shaped pickup roller, a retard or separation pad, secondary feed rollers, and spring-loaded pressure pinch rollers driven by a high-torque stepper motor through a compound reduction gear train.
Over hundreds of reams of paper, roller rubber absorbs paper dust, clay coatings, toner powder, and airborne grease, causing the surface to become slick and glazed. When the roller spins without sufficient traction, the leading edge of the sheet fails to reach the paper feed sensor within the microsecond window programmed into firmware, halting the machine with a paper jam error code.
We systematically restore the mechanical feed train on our bench:
- Rubber De-Glazing and Roller Renewal: We clean and de-glaze ethylene propylene diene monomer (EPDM) rubber pickup rollers using specialized rubber rejuvenator solvents that restore surface porosity and grip. If the rubber is flat-spotted, grooved, or cracked from age, we replace the roller tire assembly.
- Separation Pad and Torque Limiter Servicing: Multi-sheet feeding (where a printer grabs multiple sheets simultaneously) indicates a worn cork or rubber separation pad, or a fatigued torque limiter clutch spring. We replace worn friction pads and calibrate spring tension so only a single sheet enters the platen area at a time.
- Optical Sensor Lever and Interrupter Cleaning: Mechanical feed sensors use a lightweight plastic lever that rotates through an infrared photo-interrupter. Shredded paper fragments, loose paper clips, or accumulated lint can prevent the sensor flag from springing back to its resting position, triggering persistent paper jam warnings even when the feed path is completely clear. We disassemble the chassis, extract trapped foreign objects, and clean optical sensor lenses with anhydrous isopropyl alcohol.
- Gear Train Timing and Clutch Alignment: In multi-function printers, a single motor often drives both the paper feed and the purge pump through a complex mechanical cam clutch system. Misaligned gear teeth or cracked spur gears cause loud grinding noises during initialization and lock the paper feed drive in an endless error loop. We realign timing marks, replace damaged nylon gears, and lubricate pivot shafts with plastic-safe synthetic grease.
Waste Ink Pad Counter Reset and External Drain Reservoir Conversion
Every time an inkjet printer powers on, performs an automated cleaning cycle, or flushes nozzles, the purge pump pulls liquid ink through the printhead and discharges it into thick porous felt pads housed in the base of the chassis. To prevent liquid ink from overflowing onto desks or into the power supply, manufacturer firmware calculates total waste volume using an internal droplet counter stored in non-volatile EEPROM memory.
When this counter reaches 100 percent capacity, the printer enters a service lockout state: error messages like “A printer’s ink pad is at the end of its service life” or alternating flashing red LEDs block all printing and scanning functions until certified maintenance is performed.
Our San Vicente workshop handles waste ink maintenance thoroughly and cleanly:
- Digital EEPROM Counter Reset: We interface directly with printer firmware through authorized diagnostic service software utilities to reset internal waste ink protection counters back to zero percent, restoring full machine functionality.
- Waste Ink Felt Pad Replacement: Unlike temporary software-only resets that risk catastrophic ink overflow inside your machine, we open the lower housing to inspect and replace saturated felt absorbers with high-absorbency industrial felt pads, washing and drying salvageable trays thoroughly.
- External Drain Reservoir Conversion: For print shops, schools, and offices running high daily print volumes, we can install a permanent external waste ink collection tank. We route the peristaltic purge pump discharge tube out the rear chassis into an external translucent reservoir equipped with a one-way breather valve. This allows you to drain waste ink cleanly in seconds and completely eliminates internal pad saturation.
Switch-Mode Power Supply (SMPS) Rail Tracing and Mainboard Diagnostics
Printers that fail to power on, power off spontaneously mid-print, or trigger carriage drive error codes often suffer from electrical faults in their internal switch-mode power supply (SMPS) unit or logic board control circuitry.
A typical printer SMPS rectifies 220V AC mains down to two primary DC voltage domains: a high-power 24V or 42V rail dedicated to carriage servo motors, feed steppers, and purge pumps, and a regulated 3.3V or 5V logic rail powering the main system-on-chip (SoC) processor, RAM, and optical sensors.
We trace printer electrical faults using multimeters, oscilloscopes, and bench power supplies:
- Primary and Secondary Rail Isolation: We measure the high-voltage primary stage (bridge rectifiers, switching MOSFETs, PWM controllers) and test electrolytic filter capacitors for high equivalent series resistance (ESR). Blown primary diodes or swollen secondary smoothing capacitors lead to dead power supplies or heavy voltage ripple that resets the microprocessor during motor acceleration.
- Mainboard Surface-Mount Pico-Fuses: On Epson and Canon mainboards, fast-acting miniature surface-mount fuses (commonly labeled F1, F2, or F301) protect the delicate microprocessor and power supply from electrical over-stress. When ink leaks into the printhead circuit board or an FFC ribbon cable shorts, these fuses blow instantly to sacrifice themselves. We isolate the shorted component, replace the blown surface-mount fuse, and test driver impedance before powering on.
- Head Driver Transistor Pairs: A shorted printhead often damages the paired complementary PNP and NPN driver transistors (such as A2222 and C6144 on Epson logic boards) that switch high-voltage print pulses. We replace burnt driver transistor pairs and evaluate the main ASIC waveform output to ensure clean pulse timing.
Carriage Rail Lubrication and Optical Encoder Strip Servicing
The printhead carriage travels back and forth across a hardened steel guide rail hundreds of times during a single document. Precise carriage positioning relies on an optical linear encoder: a transparent micro-gridded plastic strip suspended parallel to the carriage rail, marked with 150 to 300 optical lines per inch. An infrared optical sensor mounted behind the carriage reads these lines in real time to synchronize ink drop ejection with carriage speed.
When aerosolized ink mist, paper dust, and pet hair settle onto the encoder strip, the optical sensor cannot read the positioning marks accurately. The printer loses track of carriage position, resulting in misaligned vertical lines, wavy text, or a sudden violent carriage slam against the left or right chassis wall accompanied by a fatal carriage jam error.
We service carriage motion systems with precision care:
- Optical Encoder Strip Microfiber Cleaning: We gently clean the linear encoder strip with lint-free microfiber swabs dampened with distilled water or isopropyl alcohol, removing dried ink spots without scratching the optical emulsion markings.
- Guide Rail De-Greasing and PTFE Lubrication: We clean accumulated black sludge and dried ink sludge from the steel carriage rod. We apply high-viscosity synthetic fluoropolymer (PTFE) grease or silicone oil engineered specifically for printer slider bushings. This reduces motor drag, eliminates high-pitch squealing, and prevents premature carriage motor burnout.
- Carriage Drive Belt Tensioning: Loose, stretched, or tooth-worn polyurethane carriage timing belts cause blurred photographic prints and registration drift. We inspect drive pulleys, adjust tensioner springs, and replace degraded drive belts to restore micron-level positioning accuracy.
Printer Diagnostic and Repair Comparison Matrix
The table below summarizes common printer symptoms, likely hardware root causes, our bench diagnostic methods, and realistic repair feasibility at our San Vicente workshop:
| Reported Symptom | Probable Root Cause | Bench Diagnostic Method | Repair Feasibility |
|---|---|---|---|
| Missing lines, blank streaks, or faded colors on nozzle check | Dried ink clogs in micro-nozzles, air in ink dampers, or dried purge pump cap | Microscope nozzle inspection, solvent flush, and ultrasonic cleaning bath | High recovery rate for clogged nozzles; replacement recommended if piezo crystals are cracked |
| Paper feed slips, grinds, or feeds multiple sheets together | Glazed EPDM pickup roller, worn separation pad, or broken feed gear | Friction inspection, rubber de-glazing, and separation torque spring calibration | Excellent; straightforward replacement of consumable roller tires and friction pads |
| Service required alert; alternating flashing red error lights | Waste ink pad counter reached 100% capacity in EEPROM memory | Firmware utility counter verification, felt absorber inspection, and drain line check | Fast turnaround; software counter reset paired with new felt pads or external tank |
| Carriage slams into side wall with loud grinding noise | Dirty or ink-splattered optical encoder strip, or seized carriage rail bushing | Optical grating inspection, microfiber alcohol cleaning, and synthetic PTFE rail lubrication | High success rate; cleaning the encoder strip and lubricating the rail restores smooth movement |
| False paper jam error when no paper is inside the mechanism | Dust-coated photo-interrupter sensor, stuck mechanical lever, or paper scrap | Chassis disassembly, optical sensor voltage measurement, and foreign object removal | High; clearing mechanical debris and restoring optical sensor levers resolves the warning |
| Printer is completely dead; no lights and no motor initialization | Blown SMPS power supply, shorted logic board fuse (F1/F2), or dead driver transistors | Secondary DC rail measurement, diode mode short-circuit tracing, and fuse testing | Moderate to high; component replacement on power supply or mainboard saves the machine |
Worked Bench Case: Epson EcoTank Multi-Fault Recovery
A local printing shop in San Vicente brought in an Epson EcoTank L3210 that presented two compounding failures: severe black and yellow nozzle missing that resisted standard cleaning cycles, followed by a sudden complete shutdown accompanied by alternating flashing red LEDs signaling an ink pad service error.
| Diagnostic Phase | Bench Findings & Technical Actions | Operational Outcome |
|---|---|---|
| Initial Intake & Firmware Check | Connected diagnostic software to read internal service registers. The main waste ink counter read 100.4% capacity (6,349 total purge counts), locking the machine in safety mode. A manual nozzle check pattern confirmed zero black output and 40% missing yellow nozzles. | Diagnosed simultaneous saturated waste pad lockout and severe pigment ink drying in the micro-nozzle plate caused by an aged, hardened capping station seal. |
| Waste Pad & Purge System Servicing | Disassembled lower enclosure to inspect the waste tank. Saturated felt pads were removed and disposed of responsibly. Installed fresh high-density felt absorber pads and cleared EEPROM counter registers back to 0.0%. Disassembled and flushed the peristaltic purge pump and silicone capping gasket. | Cleared firmware service lockout and restored active purge suction pressure to pull fresh ink through the printhead. |
| Printhead Micro-Fluidic Recovery | Extracted the piezoelectric printhead and connected fluid lines with warm surfactant solvent. Ran a low-pressure reverse flush to extract dried pigment sludge, followed by a 12-minute 40 kHz ultrasonic bath. Bled air from the internal dampers and reseated the FFC ribbon cable. | Restored full nozzle check pattern across all 180 black nozzles and 59 color nozzles without misdirected jets or color bleeding. |
| Final Validation & Print Calibration | Reassembled chassis and ran bidirectional printhead alignment patterns and solid CMYK color density test pages across 50 consecutive sheets of 80 gsm bond paper. | The printer produced crisp, razor-sharp text and uniform solid fills without banding or paper feed hesitations. The client avoided the substantial expense of purchasing a new EcoTank unit. |
The 50 Percent Rule: Practical Printer Repair Decisions
We believe in honest, practical repair economics. Before undertaking any work, we evaluate your printer under a clear 50 percent decision standard: if the total cost of verified replacement components and skilled bench labor exceeds half the market price of an equivalent functional printer, we advise you directly to replace the machine rather than repair it.
For modern continuous ink tank systems (like Epson EcoTank, Canon MegaTank, and HP Smart Tank), component-level repair offers outstanding financial value. Replacing worn feed rollers, recovering clogged printheads, resetting waste ink pad counters, and repairing power supplies typically cost a fraction of the price of a new ink tank machine (which currently retails between ₱8,500 and ₱15,000 in the Philippines). Conversely, for inexpensive entry-level cartridge printers that cost under ₱2,500 new, purchasing a replacement machine is almost always the more sensible choice if the printhead or logic board has failed.
Before making a decision, review our standard repair rate tiers in the Electronics Repair Pricing Hub, or explore our evaluation framework in the Repair vs Replace Hub.
Printer Intake and Workshop Logistics in San Vicente
ACJ Electronics welcomes printer drop-offs at our main workshop in Poblacion, San Vicente, Ilocos Sur. We provide component-level printer repair services for clients throughout San Vicente, Vigan City, Bantay, Santa Catalina, Caoayan, San Ildefonso, and surrounding communities in Ilocos Sur.
When dropping off your printer for diagnostics, please follow these simple intake guidelines:
- Keep Ink Tanks Secured: If your machine uses a continuous ink tank system (EcoTank or Smart Tank), ensure the ink tank transport valve is closed or ink caps are tightly sealed. Keep the printer upright at all times during transport to prevent ink from spilling into the logic board or power supply.
- Bring Power Adapters: If your printer uses an external AC power brick (common on select HP and Canon mobile models), please bring it along. For standard models using a direct two-prong AC power cord, you do not need to bring cables since our bench is fully equipped with universal power testing stations.
- Leave Ink Inside the Machine: Please do not remove ink cartridges or drain ink tanks before bringing the printer in, as our technicians require ink to perform nozzle checks, purge tests, and print quality alignments.