
ACJ Electronics provides component-level printer repair and hardware diagnostics in Poblacion, San Vicente, Ilocos Sur. Led by Angelo Carlo A. Jacinto (BS ECE, NC II), this printer repair hub guides you through printhead clogs, feed roller jams, carriage stalls, and power supply faults before committing to bench service.
When searching for reliable printer repair, an actionable printer repair guide, practical printer troubleshooting, or component-level printer hardware diagnostics, understanding the physical failure mode of your machine prevents unnecessary part replacements. As the central printer pillar resource for ACJ Electronics, this hub supports clients throughout San Vicente, Vigan City, Bantay, Santa Catalina, Caoayan, and San Ildefonso who need qualified printer repair San Vicente. Modern desktop inkjets and office laser printers combine fluid dynamic micro-nozzles, precision gear reduction trains, optical motion sensors, and high-voltage switch-mode power supplies. Distinguishing a clogged ink damper from a burned-out printhead or separating a glazed rubber pickup roller from a broken sensor flag saves substantial time and prevents wasteful spending.
If your printing equipment requires hands-on workshop service rather than DIY troubleshooting, jump directly to our dedicated commercial printer repair services or our general computer repair services. To evaluate broader equipment servicing rates, examine our cross-device Electronics Repair Pricing Hub, assess repair versus replacement economics in the Repair vs Replace Hub, review our bench instrumentation in the Tools and Skills Hub, or explore our complete workshop offerings on the services index.
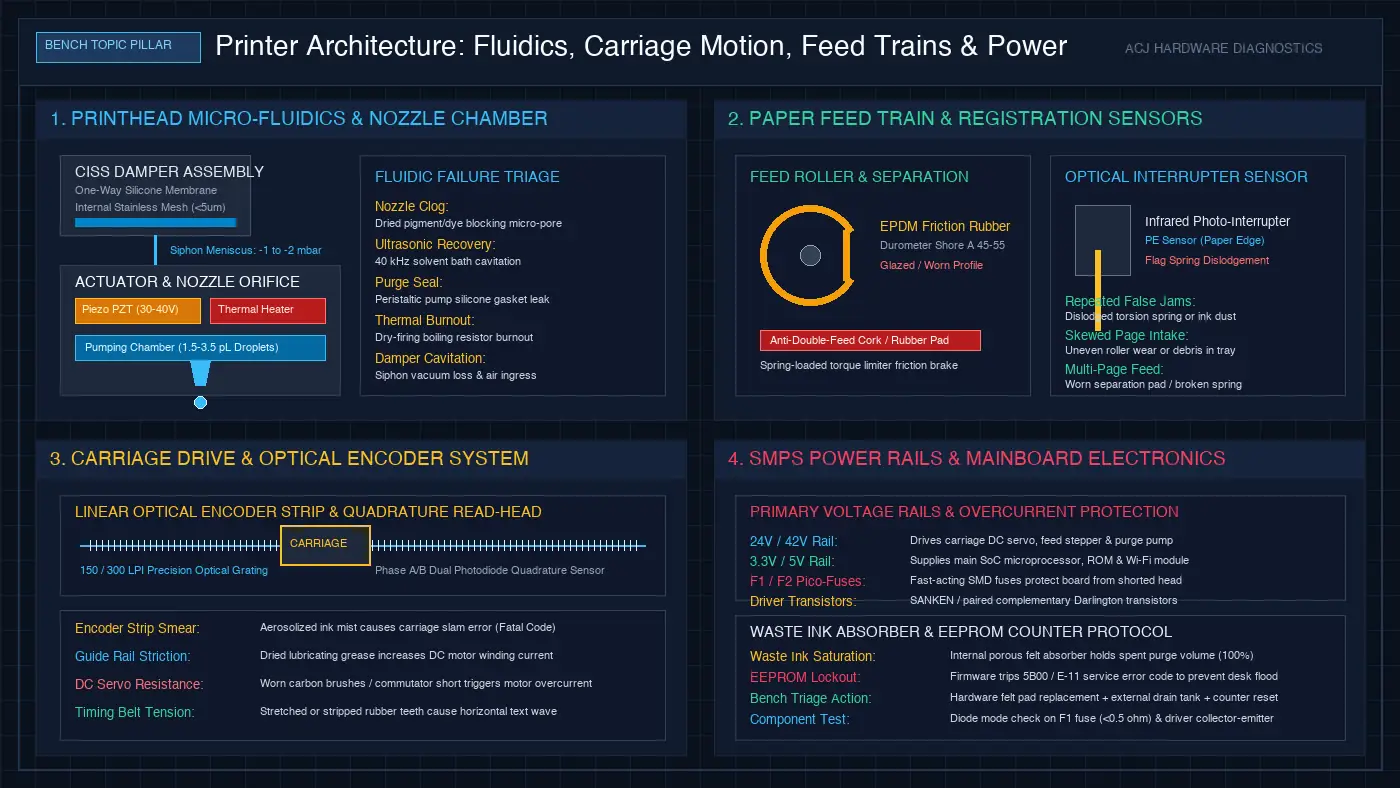
Start With Symptoms: Triage and Common Printer Failure Modes
On our engineering bench, printer failures fall into five distinct mechanical and electrical categories: micro-fluidic ink delivery, paper feed mechanics, carriage motion sensing, waste ink management, and mainboard power delivery. Identifying whether a fault stems from dried chemical pigment, glazed synthetic rubber, optical sensor contamination, or blown motherboard fuses determines the correct repair path.
Before proceeding with servicing, match your machine behavior against these diagnostic baselines:
1. Printhead Micro-Fluidics: Piezoelectric Flexing, Thermal Burnout, and Ultrasonic Flushing
Desktop inkjets generate prints using either piezoelectric actuators (standard in Epson EcoTank and WorkForce models) or thermal bubble resistors (found in Canon PIXMA, HP Smart Tank, and DeskJet series). In piezoelectric assemblies, lead zirconate titanate (PZT) ceramic crystals flex upon receiving a precise 30V to 40V drive pulse, ejecting microscopic 1.5 to 3.5 picoliter droplets through 20 to 30 micrometer nozzles. Thermal heads use thin-film resistors that rapidly flash ink past 300 degrees Celsius, forming vapor bubbles that expel droplets.
When an inkjet sits idle for weeks, volatile solvent carriers evaporate, causing pigment solids and dye binders to crystallize inside the nozzle plate. Running repeated automatic cleaning cycles pulls excess ink through the purge unit, frequently whipping micro-bubbles into the internal manifold and worsening banding. On thermal printheads, running cleaning cycles on dry nozzles permanently burns out the microscopic heating elements. We clear stubborn clogs by connecting low-pressure syringe fixtures with specialized surfactant solvents, or submerging the nozzle faceplate in a temperature-controlled 40 kHz ultrasonic cleaner while measuring coil and driver resistance. Learn more about service costs across inkjet and laser models in our verified printer repair cost guide.
2. Paper Feed Electromechanics: EPDM Roller Glazing, Separation Friction, and Optical Flag Sensors
Paper feed mechanisms rely on D-shaped ethylene propylene diene monomer (EPDM) rubber pickup rollers paired with spring-loaded separation friction pads. Over thousands of pages, airborne paper fibers and calcium carbonate filler coat the porous rubber surface, polishing it into a smooth, slick glaze with insufficient friction. In addition, humid weather in Ilocos Sur causes paper stacks to absorb ambient moisture, making sheets cling together through static and capillary attraction.
When the feed motor rotates the D-roller, a glazed surface slips against the top sheet, failing to push the paper leading edge past the mechanical registration gate within the firmware timeout window. Conversely, worn separation pads allow multiple sheets to feed simultaneously. Persistent false paper jams often occur when a piece of torn paper or a dislodged torsion return spring prevents the optical interrupter flag from dropping back into the infrared sensor slot. We de-glaze rubber rollers using chemical rejuvenators, replace worn EPDM tires, inspect separation pad durometers, and realign optical sensor flags. For systematic clearing steps, review our printer paper jam troubleshooting guide.
3. Carriage Drive and Motion: Linear Optical Encoder Strip Contamination and Motor Resistance
The print carriage travels back and forth along a polished steel guide rail, driven by a high-torque DC servo motor and a grooved rubber timing belt. Position feedback is governed by a transparent linear optical encoder strip suspended across the entire carriage span. This plastic strip contains 150 to 300 precision photo-etched lines per inch. A dual-photodiode optical read-head mounted behind the carriage reads these gratings in quadrature Phase A and Phase B pulses to calculate exact carriage position and velocity.
Over time, aerosolized ink mist from high-speed printing and stray lubricating grease from the guide rail coat the encoder strip. When grease obscures the grating lines, the optical sensor drops pulses, leading the mainboard microprocessor to conclude the carriage has stalled or drifted off track. The firmware reacts by sending maximum drive current to the carriage motor, causing the print carriage to slam violently against the side chassis before shutting down with a fatal carriage error. We clean encoder strips with 99.9% isopropyl alcohol on lint-free swabs, inspect DC motor winding resistance, lubricate guide rails with synthetic PTFE grease, and tension carriage timing belts. For decoding specific error sequences, consult our printer error codes guide.
4. Ink Delivery Mechanics: CISS Siphon Pressure, Damper Membranes, and Waste Ink Pad Resets
Continuous Ink Supply System (CISS) tank printers operate on delicate hydraulic siphon principles. Ink flows from external reservoirs through flexible silicone tubing into internal dampers seated directly above the printhead manifold. Each damper contains a fine stainless steel filtration mesh and a flexible silicone diaphragm that maintains a slight negative sub-atmospheric pressure (-1 to -2 millibar), preventing ink from dripping out of the nozzles under gravity.
If silicone tube connections develop hairline cracks or damper rubber seals harden, air enters the line. This loss of hydraulic vacuum causes ink to siphon backwards toward the tanks, starving the printhead during high-density print jobs. Beneath the transport mechanism, porous felt absorber pads capture spent ink purged during cleaning cycles. When the printer internal EEPROM page counter calculates that the waste pads have reached 100% saturation, the firmware enters a hard service lockout (such as Canon error 5B00 or Epson service required warnings). We pressure-purge CISS delivery lines, replace cracked damper diaphragms, wash or renew waste ink felt pads, install external waste drain reservoirs, and reset internal EEPROM maintenance counters.
5. Mainboard Electronics and Power Rails: SMPS Secondary Voltages, F1/F2 Fuses, and Driver Transistors
Printers integrate a compact switch-mode power supply (SMPS) module delivering dual secondary direct-current voltage rails: a high-voltage 24V or 42V rail dedicated to driving carriage servo motors, paper feed steppers, and purge pump solenoids, and a regulated 3.3V or 5V rail powering the central system-on-chip, SDRAM, EEPROM firmware, and Wi-Fi transceiver.
Electrical failures on the main logic board typically trace to the printhead interface. When ink leaks into the flexible flat cable (FFC) connector or an internal PZT crystal shorts out, a massive current spike rushes backward into the motherboard driver circuit. To protect the main processing SoC, manufacturers install microscopic, fast-acting surface-mount fuses (designated F1 and F2 on schematics). If an amateur technician bridges these blown fuses with wire without isolating the shorted printhead, the paired Sanken complementary Darlington driver transistors immediately short-circuit. This overcurrent triggers the SMPS power supply into protective hiccup shutdown mode, rendering the printer completely unpowered. We diagnose motherboard rails using a digital multimeter in diode mode, isolate shorted transistors, and replace blown SMD pico-fuses with factory-rated protective components.
Cluster Guides and Deep-Dive Diagnostic Resources
Explore our targeted troubleshooting and cost analysis resources for step-by-step diagnostic workflows across specific printer failure modes:
- Repair Pricing: Printer Repair Cost in the Philippines: Complete Rates Guide
- Feed Mechanics: Printer Paper Jam Causes: Roller Glaze and Sensor Troubleshooting
- Alert Decoding: Printer Error Codes Basics: Common Diagnostic Messages and Fixes
Printer Hardware Diagnostic and Triage Comparison Matrix
The table below summarizes common printer failure symptoms, their underlying hardware causes, bench diagnostic procedures, and realistic repair feasibility at ACJ Electronics in San Vicente:
| Reported Symptom | Probable Root Cause | Bench Diagnostic Method | Repair Feasibility |
|---|---|---|---|
| Printer is totally unresponsive with zero LEDs, no initialization sound, and no power response | Blown primary SMPS fuse, shorted MOSFET, or blown F1/F2 logic board fuse from a shorted printhead | Measure secondary 24V/42V DC rails, inspect diode mode resistance across F1 fuse and Sanken driver pairs | High (SMPS component repair or logic board SMD fuse and transistor replacement) |
| Ink levels are full, but printer outputs completely blank pages or severe horizontal gaps | Crystallized dried pigment clogging nozzle channels, or air pockets inside CISS dampers | Nozzle pattern test, vacuum siphon draw on damper manifold, chemical surfactant flush or 40 kHz ultrasonic bath | High (Non-destructive fluidic recovery and damper vacuum re-priming) |
| Printer makes grinding sounds and displays a paper jam error, but paper tray and path are empty | Displaced optical flag sensor spring, paper dust coating photo-interrupter, or glazed pickup roller | Physical inspection of PE flag pivot, infrared emitter continuity test, EPDM rubber surface inspection | High (Flag re-seating, sensor decontamination, or roller replacement) |
| Carriage moves abruptly and slams loudly against the left or right chassis wall before halting | Contaminated linear optical encoder strip with aerosolized ink mist or smeared grease | Optical inspection under loupe, gentle cleaning with 99.9% isopropyl alcohol and lint-free microfiber | High (Encoder strip restoration or optical sensor replacement) |
| Printer halts with error code 5B00 or Service Required, refusing to accept any print commands | Internal waste ink absorber felt pads have reached calculated 100% capacity in EEPROM memory | Service utility diagnostic interrogation, physical felt inspection, external drain bottle installation | High (Absorber renewal, external drain plumbing, and EEPROM counter reset) |
| Multiple sheets feed together into the mechanism or paper feeds crooked and wrinkles | Worn separation friction pad, weakened torque limiter spring, or glazed retard roller | Durometer friction check on separation pad surface, roller alignment and tension spring test | High (Separation pad replacement and roller cleaning) |
Pricing, Planning, and the 50 Percent Decision Standard
Before proceeding with any printer repair, we evaluate your equipment against our transparent 50 percent decision standard: if the combined cost of certified replacement components and professional bench labor exceeds half the market price of an equivalent working printer, we advise replacement rather than repair.
For Continuous Ink Supply System (CISS) tank printers (such as Epson L-series, Canon G-series, and HP Smart Tank models) originally costing ₱8,000 to ₱16,000, component-level servicing delivers exceptional economic value. Restoring a clogged printhead, de-glazing feed rollers, resetting an absorber counter with an external drain, or micro-soldering an SMPS power rail typically costs between 15% and 35% of the machine value, extending operational life for tens of thousands more pages. Similarly, office laser printers with replaceable pickup rollers and transfer belts are outstanding candidates for repair. Conversely, budget entry-level inkjets that rely on two small disposable cartridges costing nearly as much as the printer itself rarely justify major mechanical overhauls.
To examine standard parts and labor estimates across different hardware categories, review our comprehensive breakdown in the Electronics Repair Pricing Hub and weigh your repair economics in the Repair vs Replace Hub.
Before You Hand Your Printer In: Workshop Preparation
To ensure rapid diagnostic turnaround and prevent transport damage, follow these bench intake preparation steps before bringing your printer to our workshop in Poblacion, San Vicente, Ilocos Sur:
- Lock the Ink Tank Transportation Valve: If your printer features an external CISS tank system, switch the physical ink transportation valve to the closed position. This blocks ink from flooding the internal chassis or printhead carriage while traveling over bumpy roads.
- Keep Ink Cartridges or Tanks Installed: Never remove ink cartridges or purge tank lines before transport. Leaving printhead nozzles exposed to dry air causes remaining ink to harden within hours, creating permanent nozzle clogs.
- Bring Sample Printed Pages: If the printer still ejects paper, bring a sample page showing the defect (such as missing lines, color shifting, or horizontal banding). Seeing the exact pattern helps our bench technicians isolate the failing nozzle row immediately.
- Include the External Power Adapter: While many office printers use a standard AC power cord, compact photo and mobile printers often require a proprietary external power brick. Bring the original power supply if your unit does not plug directly into the wall.
- Avoid Forcing Jammed Paper Out: If paper is currently stuck inside the mechanism, do not yank it backward through the intake tray with force. Ripping paper leaves hidden scraps wedged between plastic feed gears and frequently snaps delicate sensor flags. Bring the unit in with the jammed paper in place for safe bench extraction.
Frequently Asked Questions
Common printer repair questions answered directly by Senior Hardware Diagnostic Engineer Angelo Carlo A. Jacinto:
Why does my printer show full ink levels but print blank pages or broken lines?
When an inkjet printer displays full ink tanks or cartridges yet ejects blank sheets or broken horizontal banding, dried ink has crystallized inside the microscopic nozzle orifices (20 to 30 micrometers wide), or air bubbles have displaced ink inside the printhead dampers. Running more than two consecutive software cleaning cycles frequently worsens the blockage by churning microscopic air bubbles into the ink manifold. On our bench, we dissolve pigment blockages with specialized warm surfactant flushes or a 40 kHz ultrasonic bath, followed by vacuum priming the damper siphon.
Why does my printer repeatedly report a paper jam when no paper is stuck inside?
False paper jams typically stem from one of three electro-mechanical faults: a displaced optical interrupter flag whose tiny torsion return spring has popped off its pivot, paper dust or aerosolized ink mist coating the infrared photo-interrupter sensor, or a glazed EPDM pickup roller that slips against paper without drawing it into the feed path within the firmware timing window. If the sensor flag does not toggle within milliseconds of motor activation, the mainboard flags a paper jam error.
Can cleaning a smeared optical encoder strip stop my printer carriage from slamming violently?
Yes. The carriage uses an infrared optical sensor reading hundreds of microscopic vertical lines per inch on a clear plastic linear encoder strip to track carriage position. Aerosolized ink mist or stray lubricating grease turns these transparent slits opaque. When the carriage sensor loses count, the mainboard assumes the carriage has stalled and sends maximum voltage to the DC carriage motor, slamming it hard against the chassis wall. Wiping the encoder strip gently with a lint-free microfiber cloth and 99.9% isopropyl alcohol immediately restores position tracking.
What causes ink pad counter errors like Canon 5B00 or Epson Service Required alerts?
Inkjet printers channel waste ink from cleaning cycles and borderless over-spray through silicone tubes into porous felt absorber pads resting in the base chassis. Firmware tracks cumulative pump revolutions in non-volatile EEPROM memory. When this calculated volume reaches 100%, the machine locks out to prevent hazardous ink overflow onto your desk. Repairing this requires physically replacing or washing the saturated felt pads, or routing an external waste drain bottle, and resetting the internal EEPROM counter using service utility software.
Why does my printer refuse to turn on after a printhead was replaced or washed?
If a printhead is reinstalled while cleaning solution remains on its ribbon cable contacts, or if an internal piezoelectric ceramic element develops an electrical short, current surges into the printhead driver circuitry. To protect the main system-on-chip, the motherboard includes surface-mount fast-acting fuses (typically labeled F1 and F2). When these fuses blow, or when the paired Sanken driver transistors short out, the switch-mode power supply detects an overcurrent and cuts power to the 42V motor rail, leaving the printer completely unpowered.
How does the 50 percent repair rule apply to inkjet and laser printers?
We apply a strict 50 percent financial feasibility standard: if replacement parts and bench labor exceed half the market price of a brand-new or equivalent working printer, we recommend replacement. For continuous ink supply system (CISS) tank printers costing ₱8,000 to ₱16,000, recovering printheads, replacing feed rollers, or resetting waste pads costs between 15% and 35% of replacement value, making repair highly economical. Conversely, entry-level disposable cartridge inkjets requiring a new printhead should almost always be replaced.
Book a Diagnostic at ACJ Electronics
Need professional printer repair in Poblacion, San Vicente, or neighboring municipalities in Ilocos Sur? Visit our workshop counter or contact our engineering team to discuss your symptoms and schedule a thorough hardware inspection before committing to paid service.